
Air Fry Haddock Recipe
** Crispy air fry haddock with panko coating ready in 12 minutes. Restaurant-quality fish without deep frying—perfect for weeknight dinners.
** Crispy air fry haddock with panko coating ready in 12 minutes. Restaurant-quality fish without deep frying—perfect for weeknight dinners.

Learn how to make Air Fry Bacon Wrapped Chicken Tenders Recipe

There’s something magical about chicken thighs roasted with five-spice powder—the way that complex blend of cinnamon, star anise, clove, and Sichuan pepper fills your kitchen is absolutely intoxicating. This recipe is perfect served over steamed rice with your favorite green vegetables, or pair it with foiled baked potatoes for a heartier meal. I’ve been making this version for years, and it never fails to impress both my family and anyone I’m cooking for.
I was maybe eight years old, sitting in my grandmother’s kitchen on a Saturday afternoon. She’d just pulled a sheet pan out of the oven, and the aroma—honestly, I can still smell it decades later. She’d learned this technique from a friend who’d lived in Shanghai, and she made it look effortless. The chicken skin crackled under her knife, and the meat inside was impossibly tender. She handed me a piece and said, “Joe, taste how the spices know exactly what they’re doing. They’re not fighting each other—they’re dancing together.”
That moment stuck with me through culinary school and into my professional cooking career. I realized she wasn’t just teaching me a recipe; she was teaching me that good cooking comes from understanding why each ingredient matters. This five-spice chicken thighs recipe carries that philosophy in every bite.
Five-spice chicken thighs represent the beautiful intersection of Chinese culinary tradition and weeknight practicality. This dish features bone-in, skin-on chicken thighs marinated in a savory blend anchored by five-spice powder—that aromatic combination of star anise, cloves, cinnamon, Sichuan pepper, and fennel that’s been central to Asian cooking for centuries.
What makes this recipe special isn’t just the spice blend itself, but how it transforms when combined with soy sauce, aromatic garlic and red onion, and a touch of sesame oil. The marinade penetrates the meat while the oven’s dry heat crisps the skin to golden perfection. I’ve always preferred thighs over breasts for this preparation because the dark meat stays moist and flavorful, even after roasting.
This is a dish that feels restaurant-quality but requires almost no active cooking time. The oven does the heavy lifting while you spend time on what matters—whether that’s family conversation, meal prep, or simply enjoying a moment of peace.
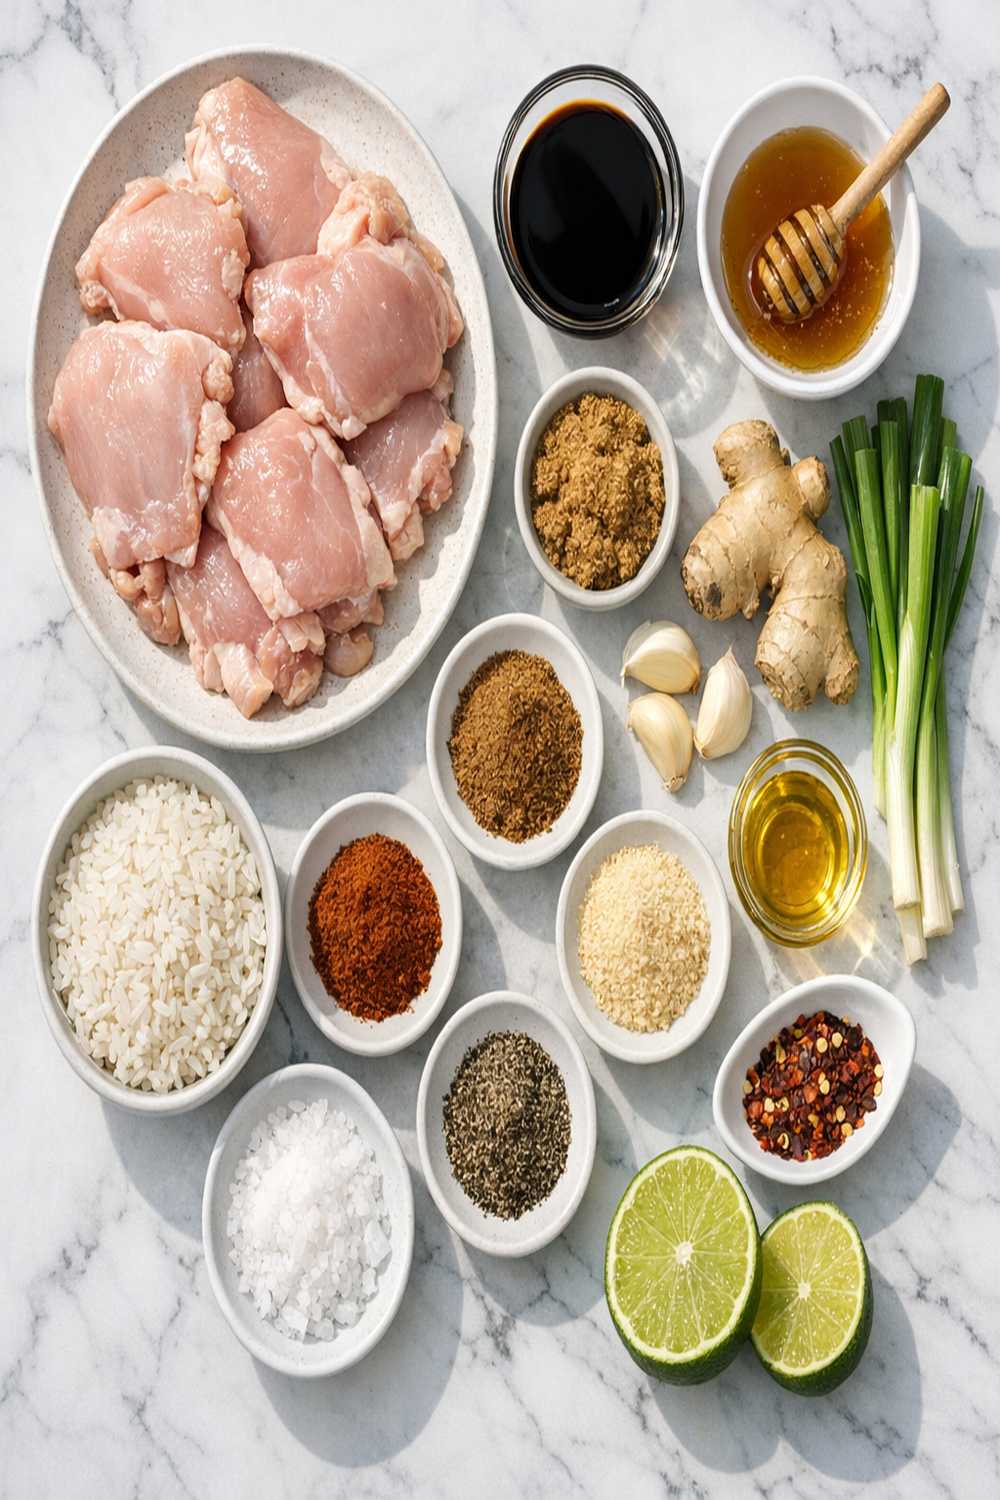
Before we start, I want to mention that every single ingredient in this marinade serves a purpose. There’s no filler here—just building blocks that create something genuinely greater than the sum of their parts. These amounts yield four servings with two thighs per person, though this scales beautifully if you’re cooking for a crowd.
This recipe breaks down into three phases: building the marinade, prepping the chicken, and roasting to golden perfection. Each step is straightforward, but I’ll explain the reasoning behind the technique because understanding the ‘why’ makes you a better cook.
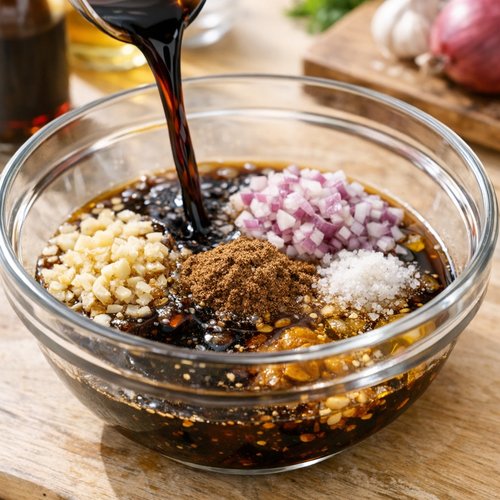
In a medium mixing bowl, combine your minced garlic, minced red onion, soy sauce, five-spice powder, salt, Shaoxing wine, sesame oil, and neutral cooking oil. Stir everything together until well combined—you want the salt to dissolve into the liquid and all the aromatics to be evenly distributed. This shouldn’t take more than a minute of stirring.
Here’s what’s happening: the soy sauce and Shaoxing wine are your liquid components, and they’re carrying flavors into the meat. The oils are emulsifying slightly, creating a cohesive marinade rather than separated components. The garlic and onion are releasing their natural sugars and sulfur compounds, which will caramelize slightly when the chicken roasts.
Pat your chicken thighs completely dry using paper towels. This step matters more than people realize—wet skin will steam rather than roast, and you’ll lose that precious crispiness we’re working toward. Don’t skip this.
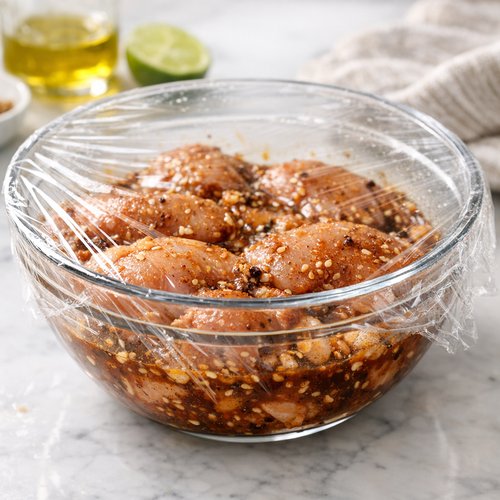
Once the thighs are dry, add them to your marinade bowl. Using your hands (this is what cooking is about—getting in there), work the marinade onto the meat, making absolutely sure to work it under the skin. That’s where the magic happens. The marinade will penetrate the meat through the underside, and when the skin roasts, it will have absorbed all these incredible flavors from beneath.

Cover your bowl with plastic wrap and refrigerate. Now, here’s where flexibility becomes your friend. You can marinate for as little as 20 minutes if you’re in a time crunch, but overnight is genuinely better. If you’re marinating overnight, pull the chicken from the fridge 30 minutes before you plan to roast it—this brings it closer to room temperature, which ensures more even cooking.
The longer marinade allows the five-spice powder to fully bloom and the soy sauce to penetrate deeper into the muscle fibers. The salt in the marinade also begins the process of breaking down proteins, which results in more tender meat. This is science working in your favor.
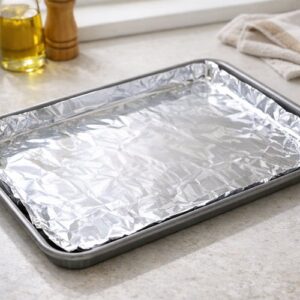
Preheat your oven to 375°F (190°C). While it’s heating, line a sturdy sheet pan with either parchment paper or non-stick foil. This step prevents sticking and makes cleanup infinitely easier—and honestly, cleanup is part of cooking too.
I prefer parchment paper because it allows slightly better air circulation under the chicken, which helps with that skin crispiness. Non-stick foil works perfectly fine if that’s what you have.

Arrange your marinated chicken thighs on the prepared pan, skin-side up. Make sure they’re not touching each other—they need space for air to circulate around them. If they’re crowded together, you’ll end up steaming instead of roasting.
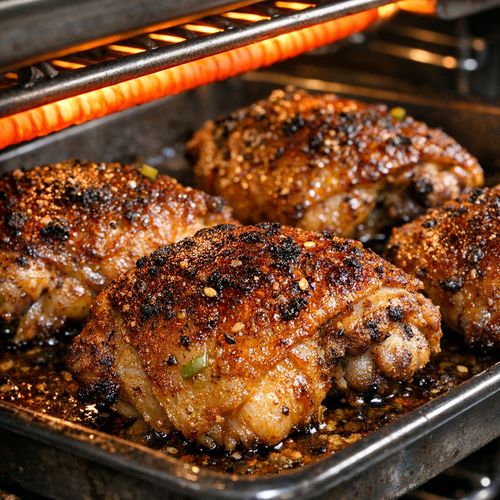
Place the pan in your preheated oven and roast for 35 to 40 minutes. The chicken is done when you pierce the thickest part of a thigh with a fork and the juices run completely clear with no pink tinge. The internal temperature should reach 165°F (74°C) when measured with an instant-read thermometer at the thickest point without touching bone.
During roasting, the marinade will caramelize on the skin, the fat will render out and create a golden crust, and the meat will cook through gently and evenly. Your kitchen will smell absolutely incredible—that five-spice aroma is unmistakable and utterly wonderful.

If after 40 minutes your chicken skin isn’t as golden and crispy as you’d like, turn on your broiler to high. Move the pan to the top rack and watch it very carefully—this is where things can go from golden to burned in about 2-3 minutes.
I’m serious about the watching part. Don’t leave the kitchen. Don’t answer your phone. Just stand there and watch those thighs transform. The broiler is intense, and you want the skin to reach deep golden-brown without actually charring. Once you see that color, pull it out immediately.
Let your chicken rest for 5 minutes before serving. This allows the residual heat to finish the cooking process and the juices to redistribute throughout the meat. If you cut into it immediately, those juices run out onto the plate instead of staying in the meat where they belong.
Transfer to a serving platter, drizzle any pan juices over the top, and serve immediately while the skin is still crispy.

As someone trained in culinary arts who’s spent years understanding how food functions in our bodies, I want to highlight something important about chicken thighs specifically. While thighs contain more fat than breasts—about 10 grams of fat per 3-ounce serving compared to 3 grams in breast meat—that’s not something to fear.
The fat in chicken thighs is primarily unsaturated fat, and it’s the carrier for fat-soluble vitamins like vitamin A and D. That fat is also what makes the meat stay moist and flavorful when cooking with dry heat like roasting. From a nutritional standpoint, the micronutrients in chicken thighs—particularly iron and B vitamins—are more bioavailable because of that fat content. You’re not just eating delicious food; you’re eating food that your body can actually use efficiently.
Preparing the marinade in advance: You can prepare the complete marinade up to 3 days ahead of time. Store it in an airtight container in the refrigerator. The flavors will actually develop and deepen slightly over time, which is a bonus. Just give it a quick stir before using.
Marinating the chicken: The chicken can marinate for up to 24 hours. I don’t recommend going longer than this because the salt and soy sauce will eventually over-penetrate the meat and change the texture in ways you don’t want. However, anywhere from 20 minutes to 24 hours works beautifully.
Roasting and storing: You can absolutely roast this chicken up to 2 days ahead of time. Cool it completely, then store it in an airtight container in the refrigerator. Reheat gently in a 325°F (163°C) oven for about 15 minutes until warmed through. The skin won’t be quite as crispy as fresh (nothing reheated ever is), but the meat will be tender and the flavors will still be vibrant.
Freezing for later: You can freeze the marinated chicken (before roasting) for up to 3 months. Marinate as directed, then freeze in individual portions in freezer bags or containers. Thaw overnight in the refrigerator before roasting—don’t try to roast from frozen, as it will take significantly longer and cook unevenly.
Absolutely. Cooked chicken thighs store beautifully for up to 4 days in an airtight container in the refrigerator. As I mentioned above, you can reheat them gently in a low oven. The skin won’t have the same crispness as fresh, but the meat stays tender and flavorful.
I don’t recommend microwave reheating because it tends to dry out chicken and makes the skin particularly rubbery. A low oven preserves the texture much better. Alternatively, you can shred the meat from the bones and use it in fried rice, grain bowls, or even cold noodle salads for something completely different the next day.
For freezing cooked chicken, store it in an airtight container or freezer bag for up to 3 months. Thaw overnight in the refrigerator before reheating.
Per serving (2 thighs), this recipe provides approximately 420 calories, 32 grams of protein, 28 grams of fat (with about 8 grams of saturated fat), and 3 grams of carbohydrates. There’s minimal sodium beyond what’s in the soy sauce because we’re using it judiciously—roughly 580mg of sodium per serving, which is reasonable for a prepared dish.
Chicken thighs are an excellent source of B vitamins, particularly niacin and B6, which support energy metabolism. They’re also rich in selenium and iron—nutrients that are particularly important if you don’t eat red meat regularly. The marinade ingredients add antioxidants from the garlic and ginger, and the five-spice powder contributes compounds like cinnamaldehyde from the cinnamon, which has been studied for anti-inflammatory properties.
These nutrition values align with USDA FoodData Central for bone-in, skin-on chicken thighs, and represent the chicken portion only—not including any sides you serve alongside.
This is where the beauty of this recipe really shines—it’s genuinely versatile. The aromatic five-spice flavors pair beautifully with so many sides, which means you can eat this same chicken four different ways during the week and have completely different meals.
Spring version: Add fresh lemon zest to the marinade and serve with asparagus and peas. The brightness of lemon complements the five-spice beautifully while keeping the dish light as the weather warms up.
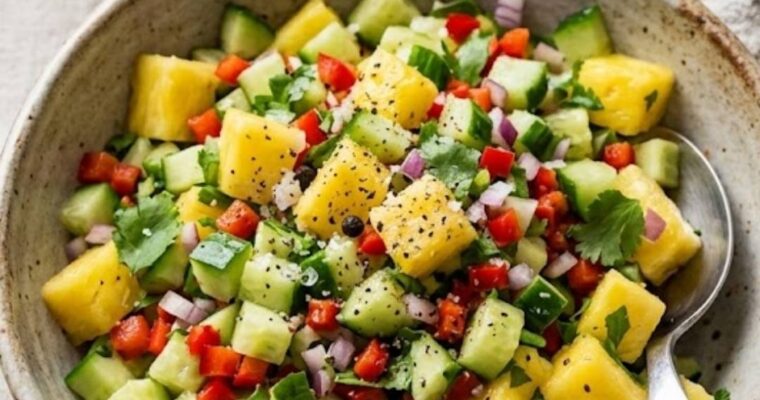
Summer version: Serve the chicken at room temperature alongside fresh pineapple salsa and a crisp cucumber salad. The tropical elements and acidity feel perfect when it’s warm outside, and you can prepare everything ahead for entertaining.
Fall version: Add a teaspoon of freshly grated ginger to the marinade for extra warmth, and serve alongside roasted root vegetables like carrots and parsnips. Consider trying French fried parsnips as a creative side. The earthiness of the vegetables echoes the warmth of the five-spice blend.
Winter version: Keep everything the same but serve the chicken over creamy polenta or with a rich mushroom sauce made from the pan drippings. The comfort-food approach feels appropriate for cold months, and the aromatic spices provide warmth and brightness when fresh produce is limited.


Technically yes, but I genuinely don’t recommend it. Chicken breasts are much leaner, which means they’ll dry out during roasting, especially at 375°F. The entire appeal of this recipe is the rendered fat creating that crispy, golden skin while the meat stays juicy underneath. Thighs have enough fat content to stay tender even with the longer roasting time. If you really prefer breasts, reduce the roasting time to 25-30 minutes and monitor them carefully with an instant-read thermometer—breast meat dries out quickly.
You can use a baking dish, but the results will be slightly different. A sheet pan allows air to circulate on all sides of the chicken, which promotes even browning and crispiness. A baking dish is more enclosed, which can trap steam and result in slightly softer skin. If you use a baking dish, place it in the upper third of your oven to get more direct heat on the skin, and consider broiling briefly at the end to crisp things up.
This usually comes down to either moisture on the skin before roasting or overcrowding on the pan. I can’t stress the patting-dry step enough—truly dry skin is essential for crispiness. Additionally, if your thighs were touching during roasting, steam built up around them and prevented browning. Try increasing the oven temperature to 400°F (204°C) next time, spacing the thighs further apart, and making sure to pat them extremely dry before roasting.
Absolutely. The marinade doubles beautifully, and you can roast up to 16 thighs on two sheet pans (8 per pan). Just make sure they’re not touching. The roasting time might increase slightly—maybe 40-45 minutes instead of 35-40—because the oven is working harder. Check for doneness with your instant-read thermometer rather than relying on timing alone.
They’re the same thing. Some brands label it “five spice powder,” others say “Chinese five spice,” and still others simply call it “five spice.” The blend should contain star anise, cloves, cinnamon, Sichuan pepper, and fennel. Check the ingredient list to make sure you’re getting the real blend, as some grocery stores sell inferior versions with lots of filler or missing key components.
This five-spice chicken thighs recipe has been part of my cooking repertoire since that day in my grandmother’s kitchen, and every time I make it, I think about her. About how food isn’t just about feeding people—it’s about connecting them to moments, to memories, to the care you put into preparation.
What I love most about this recipe is its flexibility. It works for a quiet Tuesday dinner, meal prep for the week, or entertaining guests on a weekend. The marinade is forgiving, the technique is straightforward, and the results feel genuinely impressive without requiring advanced skill.
The next time you make this, pay attention to the little moments—the aroma of five-spice blooming as the chicken roasts, the sound of that crispy skin crunching under your knife, the way the pan juices glisten with rendered fat. These sensory experiences are what cooking is about. They’re what transform a simple dinner into something memorable.
Happy Cooking!

I’ve always believed that the best meals are the ones that bridge cultures and memories. These French buckwheat crepes do exactly that—they’re nutty, delicate, and endlessly versatile. Whether you top them with fresh pineapple salsa for a bright breakfast or fold them around sautéed vegetables for dinner, they’re the kind of recipe that becomes part of your regular rotation. Let me walk you through how to make them with confidence.
I’ll never forget my first morning in Brittany, France. I was fresh out of culinary school, working a stage at a small crêperie in Concarneau, and the owner, Madame Leclerc, handed me a buckwheat crepe still warm from the pan. “This,” she said in French, “is what we eat when we want to remember who we are.”
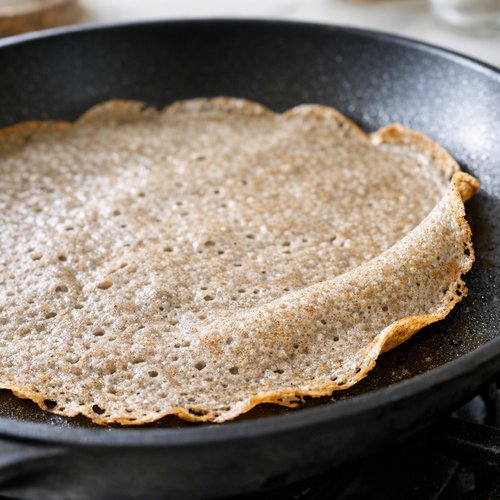
The crepe was paper-thin, with these gorgeous lacy edges that had crisped up just enough. The inside had a subtle, almost toasty sweetness—completely different from the white flour crepes I’d grown up making. That’s buckwheat. That’s Brittany. That’s the recipe I’m sharing with you today because some dishes deserve to be passed along.
French buckwheat crepes—or galettes de blé noir in Breton—are a traditional specialty from the Brittany region of France. Unlike their sweeter white-flour cousins, these crepes use buckwheat flour, which gives them a distinctive earthy, slightly nutty flavor and a more delicate texture.
Here’s what makes them special: buckwheat isn’t actually wheat at all—it’s a pseudocereal with a naturally gluten-free composition. That means these crepes have a particular kind of crispness that you can’t achieve with regular flour. When cooked properly, the edges become almost lacy, while the center stays tender. They’re traditionally served savory in Brittany (with ham, cheese, and eggs), but I love them both ways.
The technique matters here. The batter needs rest time—this allows the buckwheat flour to fully hydrate and absorb the liquid, which is crucial for achieving that perfect tender-yet-crisp texture. This is why I always tell people: patience in the kitchen isn’t about time wasted; it’s about chemistry at work.

I’ve kept this ingredient list intentionally minimal. The magic of these crepes comes from technique and ratio, not from a long list of additions. Each ingredient plays a specific role, and understanding why they’re there will make you a better cook. This recipe makes approximately 12 to 14 crepes, depending on your pan size and how thin you spread the batter.
Pro Note on Sparkling Water: If you have it on hand, sparkling water creates slightly airier crepes with more delicate edges. Still water works perfectly well, though—don’t stress if that’s what you have. The difference is subtle but worth knowing.
I’m going to walk you through this step by step. There are no shortcuts here, but there’s also nothing complicated. What matters is understanding the why behind each step so you can troubleshoot confidently if needed.
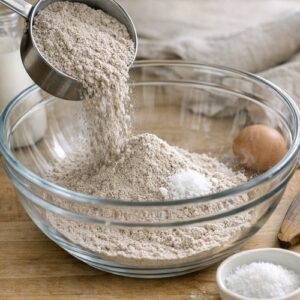
Pour your buckwheat flour into a large mixing bowl. If you’re making savory crepes, add the teaspoon of salt now. If you’re making sweet crepes, add the caster sugar instead. Whisk these together gently for about 30 seconds—this ensures the salt or sugar distributes evenly throughout the flour.
Now, use a wooden spoon or spatula to create a well in the center of your flour mixture, almost like you’re making a little nest. This well is where your wet ingredients will go, and it makes whisking the batter much easier than mixing everything at once.

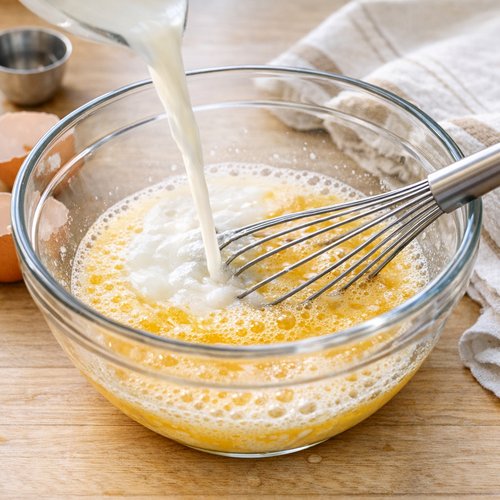
In a separate bowl, crack your 2 eggs and whisk them for about 30 seconds until they’re well combined and slightly frothy. Add your milk and water to the eggs, and whisk again for another minute until everything is fully incorporated. You want this mixture to be homogeneous—no streaks of egg white visible.
Why whisk the wet ingredients separately? Because when you pour them into the flour all at once, you can control the mixing process better. If you dump everything together, you’re more likely to overwork the batter, which can make crepes tough.
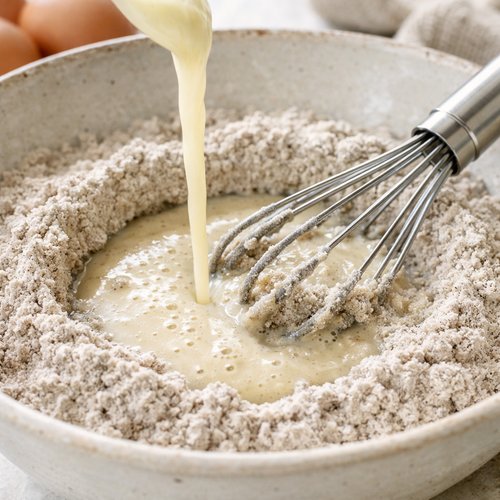
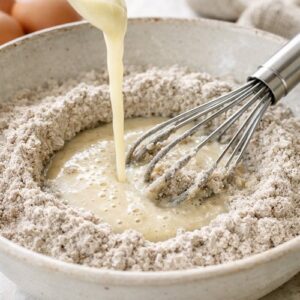
Pour about one-third of your whisked wet mixture into the well you created in the flour. Using a whisk, pull a little bit of the flour from the edges of your well toward the center, incorporating it gradually into the liquid. The key word here is gradually. You’re not trying to mix everything at once.
Once that first third is roughly combined (it’s okay if it’s a bit lumpy), add another third of your wet mixture and repeat. Finally, add the last third and whisk until you have a smooth, thin batter that resembles heavy cream or thin pancake batter. If you see a few small lumps, that’s fine—they’ll break down during resting.
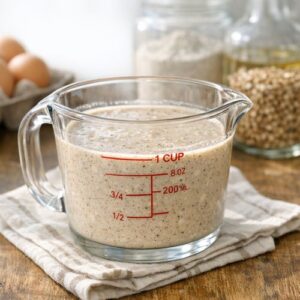
This is where patience becomes technique. Pour your batter into a measuring cup or pitcher (easier for pouring later) and let it rest at room temperature for at least 30 minutes, ideally 45 minutes to 1 hour. If you want to make these ahead, you can even rest the batter for up to 2 hours. This resting period allows the buckwheat flour to fully absorb all the liquid, which develops the structure you need for tender crepes with crispy edges.
During this time, the gluten-free starches in the buckwheat are hydrating and beginning to gelatinize. This isn’t optional—it’s what separates a great crepe from a mediocre one. I often prepare my batter in the evening and make crepes the next morning. It works beautifully.

Use a non-stick crepe pan (about 8 to 10 inches in diameter) or a non-stick skillet. Medium heat is your target—not too low, or your crepes won’t brown; not too high, or the outside will burn before the inside cooks. Let your pan preheat for about 2 minutes until it feels warm when you hold your hand above it.
Add a small piece of butter—about half a teaspoon—and let it melt and coat the pan evenly. You’ll know the pan is ready when the butter foams and the foam begins to subside. This takes about 20 seconds. The butter is crucial; it seasons the crepe and helps with browning.

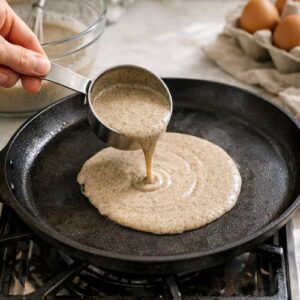
This is the moment that feels intimidating but becomes second nature quickly. Pour about ¼ cup of batter (I use a small ladle or ¼ cup measuring cup) into the center of your hot pan. Immediately tilt and swirl the pan in a circular motion—I rotate my wrist smoothly, moving the pan around so the batter spreads into a thin, even circle.
You want your crepe to be thin but not translucent. If you can see right through it, it’s too thin and will tear. If it’s thick and doughy, you used too much batter. This takes practice—by the third or fourth crepe, you’ll find your rhythm. Any crepe that doesn’t cooperate? It’s a delicious breakfast for you while you practice.
The entire swirling motion should take about 5 seconds. Once you’ve got your circle, leave the pan alone. Resist the urge to fiddle with it.

Cook your crepe on the first side for about 1 to 1½ minutes. You’ll know it’s ready to flip when you can see the edges beginning to lift and curl slightly at the sides, and the crepe has set enough that you can slide a thin spatula underneath it. The bottom should have light golden-brown spots, but it doesn’t need to be completely brown.
Buckwheat crepes cook differently than white flour crepes—they set faster because buckwheat has a different starch composition. Watch for those curling edges; they’re your signal that the structure is set.
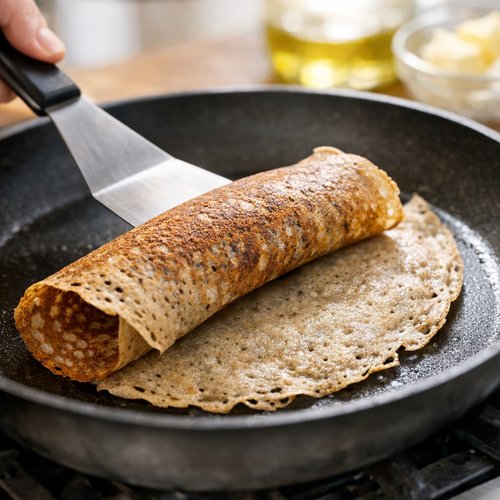
Once you see those edges curling, use a thin, flat spatula to gently loosen the crepe from the pan, then flip it over confidently. I usually slide the spatula underneath and flip it with a quick flick of my wrist—it’s satisfying, and it prevents the crepe from folding on itself.
Cook the second side for about 30 to 45 seconds. You don’t need as much color on the second side as the first; you’re just setting the structure. The bottom should have a few light spots of color, but it will be paler than the first side. This is normal and exactly what you want.
Transfer your crepe to a plate. If you’re serving it immediately, you can fill it now. If you’re stacking them for later (which I recommend for efficiency), stack them on a plate as they come off the pan—they’ll stay warm and pliable for several minutes.
After your first couple of crepes, assess your batter. If it’s too thick and doesn’t spread easily across your pan, add a tablespoon of water or milk and whisk it in. If it’s too runny and spreads too thin, add a tablespoon of buckwheat flour and whisk it in. These adjustments account for variations in humidity, your specific pan, and how thinly you like your crepes.
Keep your pitcher of batter nearby so you can make small adjustments quickly. The batter will continue to thicken slightly as it sits, so you might need to add a splash of water toward the end of cooking.

After teaching countless people how to make crepes, I’ve noticed patterns. Here are the mistakes that trip up even confident cooks:
This is where these crepes become genuinely practical for busy people. I make a double batch on Sunday and have crepe options all week.
The batter itself: You can prepare the batter up to 24 hours in advance. Store it in an airtight container in the refrigerator. Before cooking, let it come to room temperature (about 20 minutes) and give it a gentle stir. The batter may thicken slightly, so you might need to add a tablespoon of water to restore the proper consistency.
Cooked crepes: Once cooked and cooled, stack your crepes on a plate, separate each one with a sheet of parchment paper, and wrap the entire stack tightly in plastic wrap. Store in the refrigerator for up to 4 days. To reheat, I place a crepe on a plate and microwave it for 15 seconds (this keeps it from drying out), or warm it in a dry non-stick pan over medium-low heat for about 20 seconds per side.
Crepes in the freezer: I often freeze extras. Stack them with parchment between each one, wrap the stack in plastic wrap, then place it in a freezer bag. They’ll keep for up to 2 months. Thaw at room temperature for about 30 minutes before reheating.
The beauty of this system is that you can make crepes when you have time, then spend weekday mornings filling them with whatever you have on hand. This is genuine meal prep without the “meal prep” feel.
Yes, absolutely. Here’s how I handle storage at every stage:
Uncooked batter: Store in an airtight container in the refrigerator for up to 24 hours. If you’ve added water or flour for adjustments, the batter might separate slightly during storage—just give it a gentle stir before using.
Cooked crepes (refrigerator): Stack them with parchment paper between each crepe, wrap tightly in plastic wrap or aluminum foil, and store in the refrigerator for up to 4 days. They’ll stay soft and pliable, ready to fill and serve whenever you need them.
Cooked crepes (freezer): Follow the same stacking method as above, but place the wrapped stack in a freezer-safe bag. They’ll keep for up to 2 months without losing quality. Thaw at room temperature for 30 minutes before reheating.
Filled crepes: If you’ve already filled them with savory or sweet ingredients, storage depends on what’s inside. As a general rule, eat them within 1 day if they contain dairy or fresh vegetables, or within 2 days if they’re filled with something shelf-stable like jam. Don’t freeze filled crepes unless you’ve verified that your specific fillings freeze well.
Based on USDA data for buckwheat flour and standard preparation methods, one crepe (without fillings) contains approximately 145 calories, 5 grams of protein, 29 grams of carbohydrates, 2 grams of fiber, and 2 grams of fat. The exact numbers depend on your pan size and how thin you spread the batter (thinner crepes = fewer calories per crepe).
What makes buckwheat nutritionally interesting: it’s a complete protein, meaning it contains all nine essential amino acids. This makes these crepes more substantial than regular white flour crepes. They’re also high in resistant starch, which supports digestive health. The fiber content supports satiety, meaning these crepes keep you satisfied longer than you might expect.
Dietitian’s Note: Buckwheat’s manganese and magnesium content supports bone health and energy metabolism. If you’re looking for a naturally gluten-free grain option that delivers actual nutrition (not just calories), buckwheat is genuinely exceptional. Pair these crepes with protein and vegetables to create a complete, balanced meal.
One of my favorite things about this recipe is how it adapts to what’s in season:
Spring: Fill with sautéed asparagus, goat cheese, and a drizzle of lemon. The bright acidity cuts through the buckwheat’s earthiness beautifully.
Summer: Go for fresh berries and crème fraîche for sweet crepes, or fill savory versions with summer vegetables like zucchini, heirloom tomatoes, and fresh basil.
Fall: Sauté mushrooms with thyme and shallots, add some Gruyère cheese, and you’ve got a crepe that tastes like autumn. For sweet versions, try roasted pears with a touch of honey.
Winter: Braised short ribs or caramelized onions with aged cheddar make these crepes feel like comfort food. For sweet, stick with jam and winter citrus.
This is where creativity meets practicality. These crepes work with nearly any filling you can imagine, but here are my go-to combinations:


This almost always comes down to one of two things. First, you might have skipped or rushed the resting period. The batter needs that 30-minute rest to allow the buckwheat flour to fully hydrate. Without it, your crepes will be dense and tough. Second, you might be overmixing the batter. Once you’ve combined your wet and dry ingredients, stop whisking. A few small lumps are fine and will disappear during cooking; aggressive mixing develops gluten-like proteins even in buckwheat, which toughens the crepes.
Yes! Buckwheat flour is naturally gluten-free, making this recipe inherently suitable for celiac disease. However, if you’re cooking for someone with celiac, verify that your buckwheat flour is certified gluten-free, as cross-contamination can occur during harvesting or processing. Also, ensure your other ingredients (salt, sugar, eggs, milk, and butter) are also gluten-free certified if you’re concerned about trace amounts.
This usually means either your batter didn’t rest long enough, or your pan temperature is inconsistent. If the batter hasn’t rested enough, the structure isn’t set properly when you flip. Try resting for the full hour and see if that helps. If temperature is the issue, let your pan heat for a full 2 minutes before adding batter, and keep the heat steady at medium throughout cooking. Also, make sure your spatula is thin and flexible—a thick or heavy spatula can catch and tear the crepe.
Those lacy edges are exactly what happens when buckwheat batter hits a hot pan and sets quickly. You’re not doing anything special; it’s just the natural behavior of buckwheat starch. What you can do to enhance it: make sure your pan is properly preheated, use a little butter for browning, and cook at medium heat (not too low, or you won’t get crispy edges; not too high, or they’ll burn before cooking through). Those edges are the reward for doing the basics right.
No, I recommend making separate batches. If you’re making sweet crepes, you add caster sugar to the batter, which affects how it browns and tastes. If you’re making savory crepes, you use salt instead. The flavor difference is significant enough that mixing them together will be unsatisfying. Make one batch of each if you want both options—the batter takes 10 minutes to prepare, and you’ll have enough crepes for the whole week.
There’s something genuinely special about mastering a recipe that has generations of tradition behind it. These French buckwheat crepes aren’t complicated, but they’re worth learning because they teach you fundamental cooking skills—understanding ingredient interactions, respecting resting times, managing pan temperature, and building confidence through repetition.
I still think about that morning with Madame Leclerc sometimes. She wasn’t just teaching me how to make crepes; she was showing me that food is about patience, precision, and respect for tradition. Every crepe you make is a small act of that same respect. Start with the batter today, let it rest while you have your coffee, and by tomorrow morning you’ll have the foundation for a week of beautiful, delicious meals.
Happy Cooking!
When summer arrives, the grill starts getting a workout. I can’t help but whip up my favorite grilled chicken, especially when it’s paired with my Fresh Pineapple Salsa. Its bright flavors and zesty kick make it the ideal companion to grilled meats. Each bite feels …

When I think about dishes that pair beautifully with a hearty main course, French fried parsnips are right up there on the list. Whether you’re serving up grilled chicken, a savory roast, or simply a generous veggie platter, these golden, crispy delights steal the show.
They’re not just a side; they bring a delightful twist that your guests will rave about. I can’t tell you how many times I’ve served these alongside my famous herb-roasted chicken and watched everyone reach for seconds.

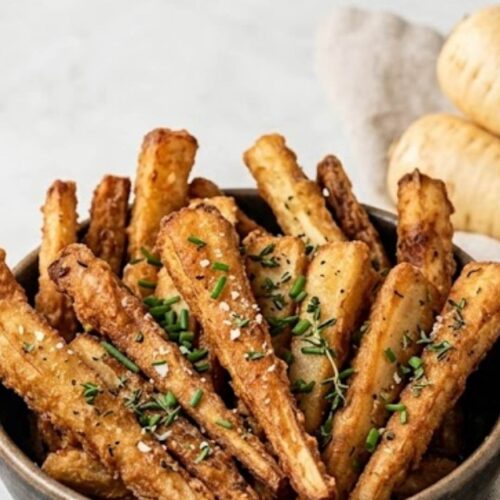
French fried parsnips might just be the hidden gem in your kitchen repertoire. They are delightfully crispy on the outside yet tender on the inside, transforming this earthy root vegetable into a tasty side that complements a variety of dishes.
I first stumbled upon this recipe while trying to incorporate more veggies into my meals. I had some parsnips in my fridge, and after a few experiments, I found the perfect way to fry ’em up. Trust me, you’ll want to add this to your rotation!
French Fried Mashed Potatoes Recipe
French fried parsnips are essentially parsnip slices, seasoned and roasted until they achieve a crispy golden exterior. The technique is simple but effective: they provide a crunch reminiscent of fries, while delivering the unique, sweet, and nutty flavor that parsnips offer. Whether you’re trying to impress guests or just want a tasty snack, this dish is a fantastic option.
What sets my version of French fried parsnips apart is the blend of fresh spices and the generous sprinkle of Parmesan cheese. While many recipes stick to basic salt and pepper, this one incorporates garlic powder and turmeric for an added flavor punch. Plus, the use of high-quality olive oil brings depth to every bite. Not to mention, I’ll share my secret to achieving that perfect crunch without deep frying, making this dish both healthier and equally satisfying.
Picture biting into a golden parsnip fry—the crunch resonates as you taste the warm, slightly sweet root mingling with savory garlic and cheese. The subtle earthy notes from the turmeric peek through, enhancing the overall flavor without overpowering it. They’re not just fries; they offer a complex profile that keeps you coming back for more.

Here’s what you’ll need to whip up these crispy delights:
– 3-4 large parsnips
– ¼ cup olive oil or avocado oil
– 1 tsp garlic powder
– 1 tsp minced garlic
– ½ tsp turmeric
– Sea salt, to taste
– 2 tbsp grated Parmesan cheese
– 1 tsp paprika (a delightful addition for extra warmth)
– Fresh parsley for garnish (adds color and fresh flavor)
Ingredients From : bucketlisttummy.com
Making French fried parsnips is simple and quick. Follow along as I break it down step-by-step to ensure your fries come out perfectly crispy and full of flavor.

Before anything else, preheat your oven to 400°F (200°C). This temperature is key for achieving that crunch you want. A hot oven will help the fries crisp up nicely.

Begin by washing and peeling the parsnips under cool running water. Once they’re clean and peeled, slice them into even sticks; around half an inch thick works well. You want them to cook evenly, so keeping them uniform is essential.

In a mixing bowl, add the parsnip sticks. Drizzle in the olive oil and toss them to coat thoroughly. Next, sprinkle in the garlic powder, minced garlic, turmeric, paprika, and sea salt. Mix until all the parsnips are evenly seasoned. The colors in the bowl will be beautiful, promising deliciousness!

Spread the seasoned parsnips out in a single layer on a baking sheet lined with parchment paper. Avoid overcrowding; letting them breathe helps them get crispy.

Pop the baking sheet into the oven and set a timer for 15 minutes. When the time’s up, take out the sheet and carefully flip the parsnips using a spatula. Now, sprinkle Parmesan cheese on top—it will melt and create a lovely savory crust.

Return the baking sheet to the oven and bake for an additional 15 minutes. Keep an eye on them toward the end to ensure they turn a gorgeous golden brown. When they’re perfectly crispy, take them out and let them cool for a few minutes before serving.
– Uniform Slices: Ensure your parsnip slices are even for consistent cooking.
– Use Parchment Paper: Line your baking sheet for easy cleanup and to prevent sticking.
– Crispier Finish: If you want extra crispiness, broil them for a couple of minutes at the end, but keep an eye to prevent burning.
– Flavor Variations: Experiment with different spices like smoked paprika or dried rosemary for varied taste profiles.
– Batch Cooking: Feel free to double the recipe; they keep well for reheating and are perfect for meal prep!
If you happen to have leftovers (which I doubt, because they’re that good!), simply store them in an airtight container in the fridge for up to three days. Reheat in an oven or air fryer to regain crispiness. Microwaving them will make them soggy, and nobody wants that!
Here are five delightful ways to serve your French fried parsnips:
– With Dips: Pair them with a zesty garlic aioli or a classic ranch dressing for a satisfying snack.
– As a Side Dish: They complement grilled proteins like chicken or fish beautifully.
– On Salads: Top a fresh green salad with crispy parsnips for added crunch and flavor.
– In Wraps: Slice them up and toss into a wrap with greens, hummus, and your favorite protein.
– Garnished: Sprinkle with fresh herbs, such as parsley or chives, to add that pop of color and flavor.
If you want to switch things up, consider these alternatives:
– Sweet Potatoes – Swap parsnips for sweet potatoes for a sweeter flavor.
– Carrots – Carrots can provide a similar texture and flavor profile.
– Zucchini – Use zucchini for a lighter option; just adjust cooking time as it cooks faster.
– Cauliflower – Cut cauliflower into florets for a low-carb alternative; bake until golden.
– Eggplant – Sliced eggplant can also work beautifully with the same seasonings.
1. Can I use frozen parsnips?
Yes, but they might not get as crispy. It’s best to use fresh ones for optimal texture.
2. What if I don’t have Parmesan cheese?
You can omit it or substitute with nutritional yeast for a dairy-free option.
3. Can I air fry these parsnips instead?
Absolutely! Air frying works great. Cook at 375°F for about 15-20 minutes, shaking halfway through.
4. Are parsnips healthy?
Yes! They are rich in fiber and vitamins while being lower in calories compared to potatoes.
5. How can I make this dish vegan?
Simply skip the Parmesan cheese or use a vegan parmesan alternative.
French fried parsnips bring a delightful twist to your usual vegetable side dish lineup. Their crispy texture, combined with savory spices and cheese, creates a dish that pleases everyone at the table.
So next time you’re in the mood for something a little different, grab a few parsnips and give this recipe a whirl. You might just find your new favorite way to enjoy this underrated veggie! Happy cooking!

Picture this: it’s a sunny Saturday afternoon, and you’re gathering with friends and family for a cozy barbecue in your backyard. As the grills sizzle and laughter floats through the air, the last thing you want is just another boring side dish. Enter the French …